
테스트 - 데이터베이스 연동
데이터 접근 기술은 실제 데이터베이스에 접근해서 데이터를 잘 저장하고 조회할 수 있는지 확인하는것이 중요하다.
테스트를 해보자
@SpringBootTest
class ItemRepositoryTest {

    @Autowired
    ItemRepository itemRepository;

    @AfterEach
    void afterEach() {
        //MemoryItemRepository 의 경우 제한적으로 사용
        if (itemRepository instanceof MemoryItemRepository) {
            ((MemoryItemRepository) itemRepository).clearStore();
        }
    }

    @Test
    void save() {
        //given
        Item item = new Item("itemA", 10000, 10);

        //when
        Item savedItem = itemRepository.save(item);

        //then
        Item findItem = itemRepository.findById(item.getId()).get();
        assertThat(findItem).isEqualTo(savedItem);
    }

    @Test
    void updateItem() {
        //given
        Item item = new Item("item1", 10000, 10);
        Item savedItem = itemRepository.save(item);
        Long itemId = savedItem.getId();

        //when
        ItemUpdateDto updateParam = new ItemUpdateDto("item2", 20000, 30);
        itemRepository.update(itemId, updateParam);

        //then
        Item findItem = itemRepository.findById(itemId).get();
        assertThat(findItem.getItemName()).isEqualTo(updateParam.getItemName());
        assertThat(findItem.getPrice()).isEqualTo(updateParam.getPrice());
        assertThat(findItem.getQuantity()).isEqualTo(updateParam.getQuantity());
    }

    @Test
    void findItems() {
        //given
        Item item1 = new Item("itemA-1", 10000, 10);
        Item item2 = new Item("itemA-2", 20000, 20);
        Item item3 = new Item("itemB-1", 30000, 30);

        itemRepository.save(item1);
        itemRepository.save(item2);
        itemRepository.save(item3);

        //둘 다 없음 검증
        test(null, null, item1, item2, item3);
        test("", null, item1, item2, item3);

        //itemName 검증
        test("itemA", null, item1, item2);
        test("temA", null, item1, item2);
        test("itemB", null, item3);

        //maxPrice 검증
        test(null, 10000, item1);

        //둘 다 있음 검증
        test("itemA", 10000, item1);
    }

    void test(String itemName, Integer maxPrice, Item... items) {
        List<Item> result = itemRepository.findAll(new ItemSearchCond(itemName, maxPrice));
        assertThat(result).containsExactly(items);
    }
}
@SpringBootTest
- ItemREpositoryTest는 @SpringBootTest를 사용한다. @SpringBootApplication을 찾아서 설정으로 사용한다.
- 과거에는 MemoryCOnfig.class를 사용했다가 이제는 JdbcTemplateV3Config.class를 사용하도록 변경했엇다. 따라서 테스트도 실제 데이터베이스를 호출하게 된다.
결과 : save(), update() 성공, findItems() 실패
findItems() 코드를 보면, 3개의 데이터가 있는 조건에서 테스트가 성공한다. 그러나 현재 DB에는 이전에 서버를 실행하면서 저장했던 데이터가 보관되어 있기 때문에 테스트가 실패한다. 따라서 로컬에서 사용하는 서버와 테스트 서버는 다른 환경에서 사용해야 한다.
테스트 - 데이터베이스 분리
로컬에서 사용하는 서버와 테스트의 서버가 같은 데이터베이스를 사용하고 있어서 테스트가 실패했다.
이런 문제를 해결하려면 테스트를 다른 환경과 철저히 분리해야한다.
spring.datasource.url=jdbc:h2:tcp://localhost/~/testcase
spring.datasource.username=sa
spring.datasource.password=

spring.profiles.active=test
logging.level.sql=debug
(최초 한번 jdbc:h2:~/testcase 실행해서 mv.db 파일 생성을 확인)
findItem() 테스트를 실행하면 성공한다. 그런데 두번 째 테스트를 시도하면 실패한다.
처음 테스트 실행할 때 저장한 데이터가 남아있기 때문에 두번째 테스트에 영향을 준 것이다. 이 문제를 해결하려면 테스트가 끝날 때 마다 해당 테스트에서 추가한 데이터를 삭제해야 다른 테스트에 영향을 주지 않는다.
테스트의 중요한 원칙
- 테스트는 다른 테스트와 격리해야 한다.
- 테스트는 반복해서 실행할 수 있어야 한다.
테스트 - 데이터 롤백
트랜잭션과 롤백 전략
이 때 도움되는게 트랜잭션이다. 테스트가 끝나고 트랜잭션을 강제로 롤백해버리면 데이터가 제거된다.
데이터를 이미 저장했는데, 테스트가 실패해서 롤백을 호출하지 않아도 괜찮다. 커밋하지 않았기 때문에 데이터베이스에 반영되지않는다.
@SpringBootTest
class ItemRepositoryTest {

    @Autowired
    ItemRepository itemRepository;

    @Autowired
    PlatformTransactionManager transactionManager;
    TransactionStatus status;

    @BeforeEach
    void beforeEach() {
        // 트랜잭션 시작
        status = transactionManager.getTransaction(new DefaultTransactionDefinition());
    }

    @AfterEach
    void afterEach() {
        //MemoryItemRepository 의 경우 제한적으로 사용
        if (itemRepository instanceof MemoryItemRepository) {
            ((MemoryItemRepository) itemRepository).clearStore();
        }
        // 트랜잭션 롤백
        transactionManager.rollback(status);

    }
}
beforeEach에서 트랜잭션 시작 -> 테스트 종료 후 롤백 처리
트랜잭션 매니저는 PlatformTransactionManager를 주입 받아서 사용하면 된다. (스프링 부트가 자동으로 빈 등록)
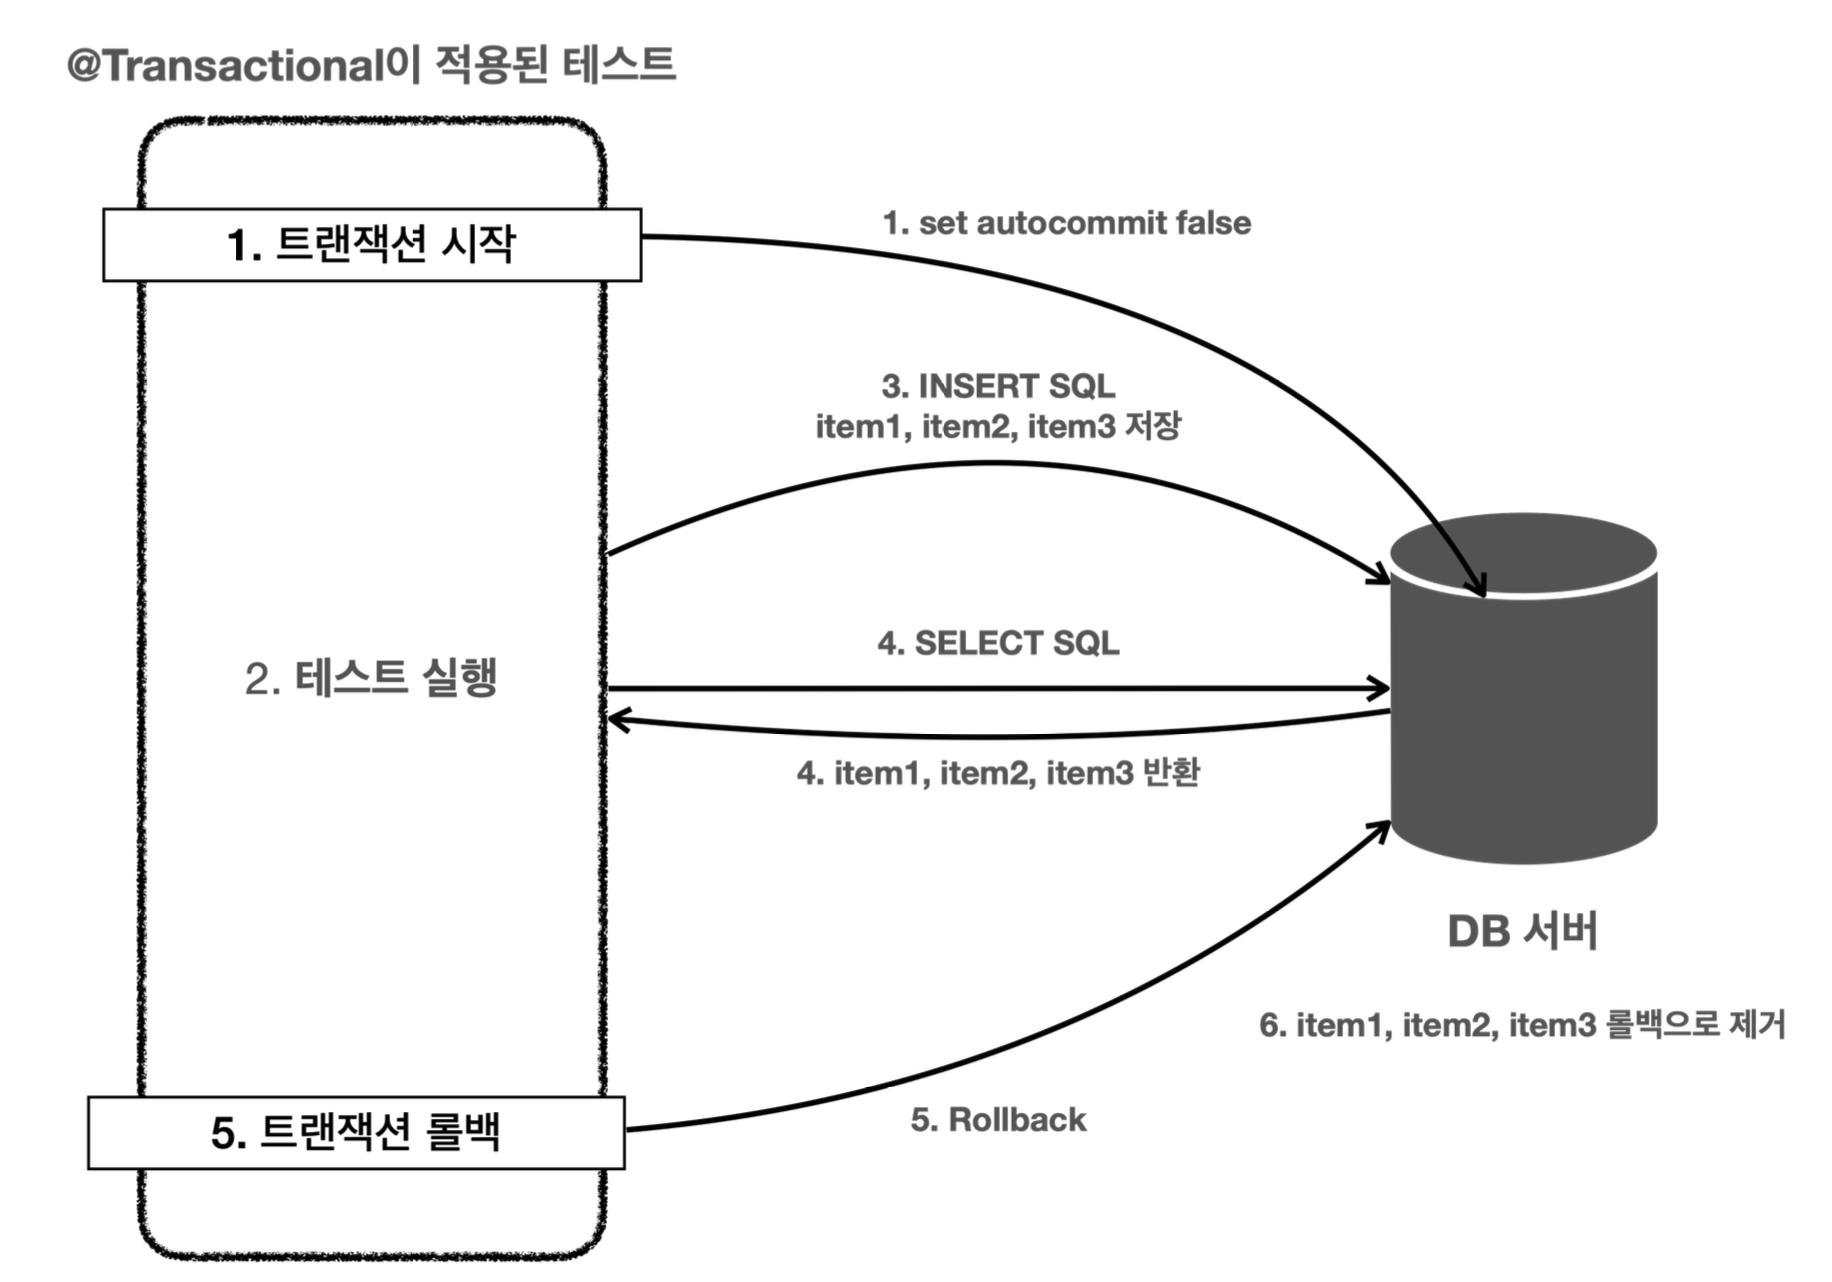
테스트 - @Transactional
@Transactional을 사용하면 위 방식들을 자동으로 사용할 수 있다.
@Transactional
@SpringBootTest
class ItemRepositoryTest {

    @Autowired
    ItemRepository itemRepository;

//    @Autowired
//    PlatformTransactionManager transactionManager;
//    TransactionStatus status;
//
//    @BeforeEach
//    void beforeEach() {
//        // 트랜잭션 시작
//        status = transactionManager.getTransaction(new DefaultTransactionDefinition());
//    }

    @AfterEach
    void afterEach() {
        //MemoryItemRepository 의 경우 제한적으로 사용
        if (itemRepository instanceof MemoryItemRepository) {
            ((MemoryItemRepository) itemRepository).clearStore();
        }
        // 트랜잭션 롤백
//        transactionManager.rollback(status);
    }
}
@Transactional은 로직이 성공하면 커밋되는데 왜 롤백이 되냐?
- 테스트에서 사용하면 테스트를 트랜잭션 안에서 실행하고, 테스트가 끝나면 자동으로 롤백 시켜버린다.
강제로 커밋하기 - @Commit
@Transactional을 사용하면 자동으로 롤백되기 때문에 DB에 데이터가 남아있지 않아서 조회해도 나오지 않는다.
이럴 때 확인하고 싶을 땐 해당 메서드 또는 클래스에 @Commit을 붙이면 테스트 종료 후 롤백 대신 커밋이 호출된다.
테스트 - 임베디드 모드 DB
테스트 케이스를 실행하기 위해서 별도의 DB를 설치하고 운영하는것은 상당히 번거롭다. 단순히 테스트 용도로만 사용하기 때문에 테스트가 끝나면 DB를 제거해도 된다.
임베디드 모드
H2 데이터베이스는 자바로 개발되어 있고, JVM안에서 메모리 모드로 동작하는 특별한 기능을 제공한다. 애플리케이션을 실행할 때 H2도 내장해서 함께 임베디드 모드로 동작하게 할 수 있다. 애플리케이션이 종료되면 H2도 함꼐 종료되고, 데이터도 모두 사라진다.
package hello.itemservice;

import hello.itemservice.config.*;
import hello.itemservice.repository.ItemRepository;
import lombok.extern.slf4j.Slf4j;
import org.springframework.boot.SpringApplication;
import org.springframework.boot.autoconfigure.SpringBootApplication;
import org.springframework.context.annotation.Bean;
import org.springframework.context.annotation.Import;
import org.springframework.context.annotation.Profile;
import org.springframework.jdbc.datasource.DriverManagerDataSource;

import javax.sql.DataSource;

@Slf4j
@Import(JdbcTemplateV3Config.class)
@SpringBootApplication(scanBasePackages = "hello.itemservice.web")
public class ItemServiceApplication {

    public static void main(String[] args) {
       SpringApplication.run(ItemServiceApplication.class, args);
    }

    @Bean
    @Profile("local")
    public TestDataInit testDataInit(ItemRepository itemRepository) {
       return new TestDataInit(itemRepository);
    }

    @Bean
    @Profile("test")
    public DataSource dataSource() {
       log.info("메모리 데이터베이스 초기화");
       DriverManagerDataSource dataSource = new DriverManagerDataSource();
       dataSource.setDriverClassName("org.h2.Driver");
       dataSource.setUrl("jdbc:h2:mem:db;DB_CLOSE_DELAY=-1");
       dataSource.setUsername("sa");
       dataSource.setPassword("");
       return dataSource;
    }
}
@Profile이 "test" 인 경우에만 DataSource를 빈으로 등록한다. 테스트 케이스에서만 이 데이터 소스를 스프링 빈으로 등록해서 사용하겠다는 의미이다.
그리고 나서 테이블을 만들어줘야한다. 새로 만들어진 비어있는 DB이기 때문이다.
schema.sql
drop table if exists item CASCADE;
create table item
(
    id bigint generated by default as identity,
    item_name varchar(10),
    price integer,
    quantity integer,
    primary key (id)
);
스프링 부트는 SQL 스크립트를 실행해서 애플리케이션 로딩 시점에 데이터베이스를 초기화 하는 기능을 제공한다.
테스트 - 스프링 부트와 임베디드 모드
스프링 부트는 임베디드 데이터베이스에 대한 설정도 기본으로 제공한다.
스프링 부트는 데이터베이스에 대한 별다른 설정이 없으면 임베디드 데이터베이스를 사용한다.
application.properties
spring.profiles.active=test

#spring.datasource.url=jdbc:h2:tcp://localhost/~/testcase
#spring.datasource.username=sa
#spring.datasource.password=

logging.level.root=debug
package hello.itemservice;

import hello.itemservice.config.*;
import hello.itemservice.repository.ItemRepository;
import lombok.extern.slf4j.Slf4j;
import org.springframework.boot.SpringApplication;
import org.springframework.boot.autoconfigure.SpringBootApplication;
import org.springframework.context.annotation.Bean;
import org.springframework.context.annotation.Import;
import org.springframework.context.annotation.Profile;
import org.springframework.jdbc.datasource.DriverManagerDataSource;

import javax.sql.DataSource;


//@Import(MemoryConfig.class)
//@Import(JdbcTemplateV1Config.class)
//@Import(JdbcTemplateV2Config.class)
@Slf4j
@Import(JdbcTemplateV3Config.class)
@SpringBootApplication(scanBasePackages = "hello.itemservice.web")
public class ItemServiceApplication {

    public static void main(String[] args) {
       SpringApplication.run(ItemServiceApplication.class, args);
    }

    @Bean
    @Profile("local")
    public TestDataInit testDataInit(ItemRepository itemRepository) {
       return new TestDataInit(itemRepository);
    }

//  @Bean
//  @Profile("test")
//  public DataSource dataSource() {
//     log.info("메모리 데이터베이스 초기화");
//     DriverManagerDataSource dataSource = new DriverManagerDataSource();
//     dataSource.setDriverClassName("org.h2.Driver");
//     dataSource.setUrl("jdbc:h2:mem:db;DB_CLOSE_DELAY=-1");
//     dataSource.setUsername("sa");
//     dataSource.setPassword("");
//     return dataSource;
//  }
}
데이터베이스에 접근하는 설정 정보도 모두 없애면 자동으로 임베디드 데이터베이스를 사용한다.
따라서 별도의 테스트 케이스를 위한 데이터베이스 설정을 하지 않아도 된다.
'Spring' 카테고리의 다른 글
| 스프링 트랜잭션 이해 (0) | 2025.10.30 |
|---|---|
| 데이터 접근 기술 - MyBatis (0) | 2025.10.21 |
| 데이터 접근 기술 - 스프링 JdbcTemplate (0) | 2025.10.18 |
| 스프링과 문제 해결 - 예외처리, 반복 (0) | 2025.10.17 |
| 자바 예외 이해 (0) | 2025.10.16 |